GitHub, FreeCAD and Blender

GitHub Keys

Make sure you have setup a free account on GitHub at www.github.com.

Open VS Code inside the dev container and type

ssh-keygen

Follow the commands and then run:

cat ~/home/ros/.ssh/id_rsa.pub

Copy that into your GitHub ssh key list and you will be good to go.

Setup The Environment

Now we have the ssh keys setup, we can run the setup script.

Go Ctrl+Shift+P and Run Task setup.

This will download FreeCAD, the src repositories for our workspace and install any dependencies we might need.

FreeCAD

FreeCAD is easy to setup in our robotics workspace. Open up VS Code inside the dev container and use Ctrl+Shift+P to run task freecad.

Play with FreeCAD, but here are some quick tips:

  • Be aware of what workbench you are in. You'll need to be in the right workbench to do what you want. I like to switch between the "Part Design" and "Sketch" workbenches.

  • You need to create parts, and parts have "bodies" these bodies are the different components in FreeCAD. Note that a body has to be continuous.

  • In the "Model" tab you can see a big list of all the different things you are modelling. It's really handy to hide things by selecting them and hitting spacebar.

  • Also be aware of what is the current "active body", when you have multiple bodies this will become important.

  • You can change a bodies properties, in particular you can change it's name so its easier.

Blender

Download blender from: https://www.blender.org/download/

Blender is a powerful and complex tool. We will be using to modify meshes materials.

Open blender and change the material of the default box.

Select the "Cube" in the scene collection:

Make sure you are in "Edit mode"

Make sure you are in "Material preview" mode:
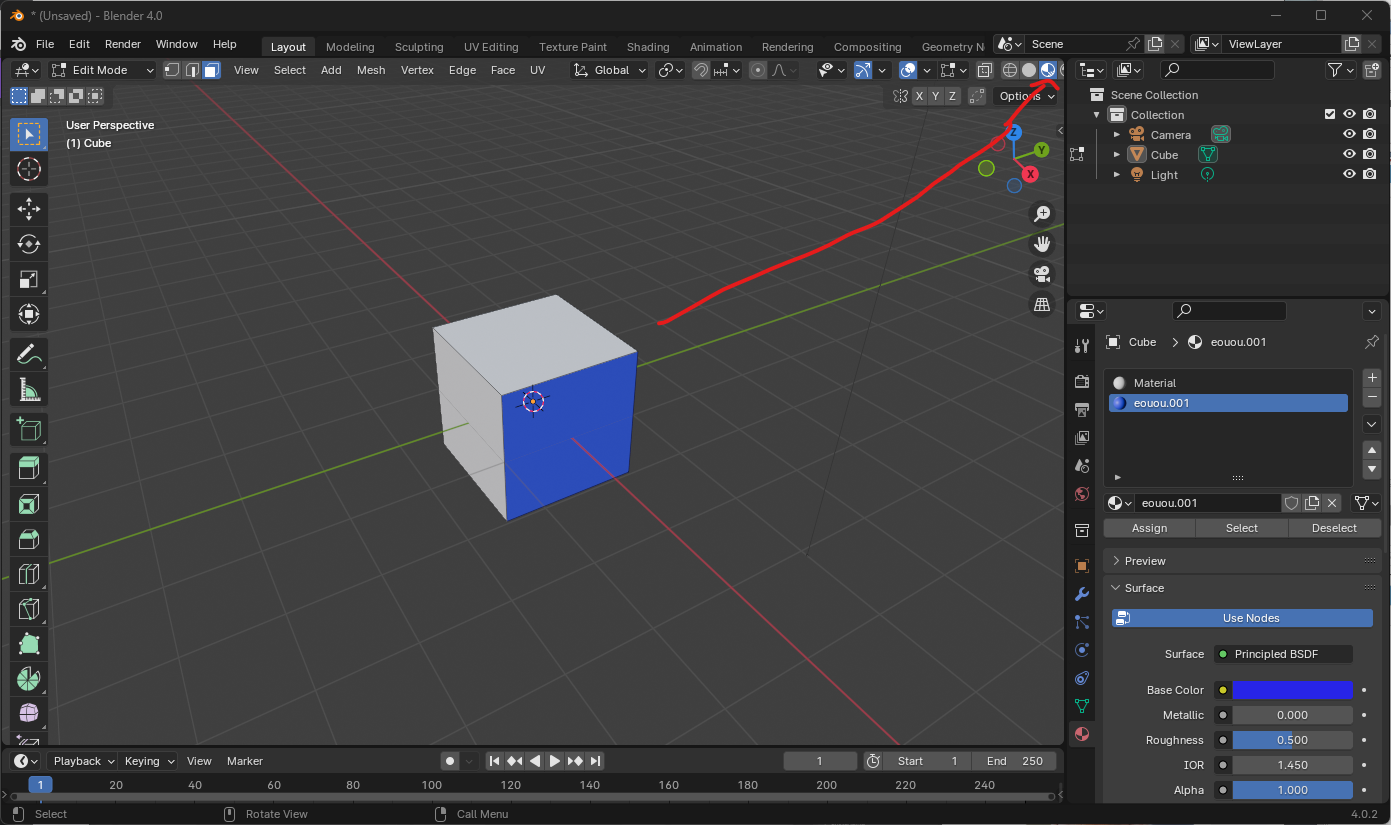
Change your selection to "Face select"
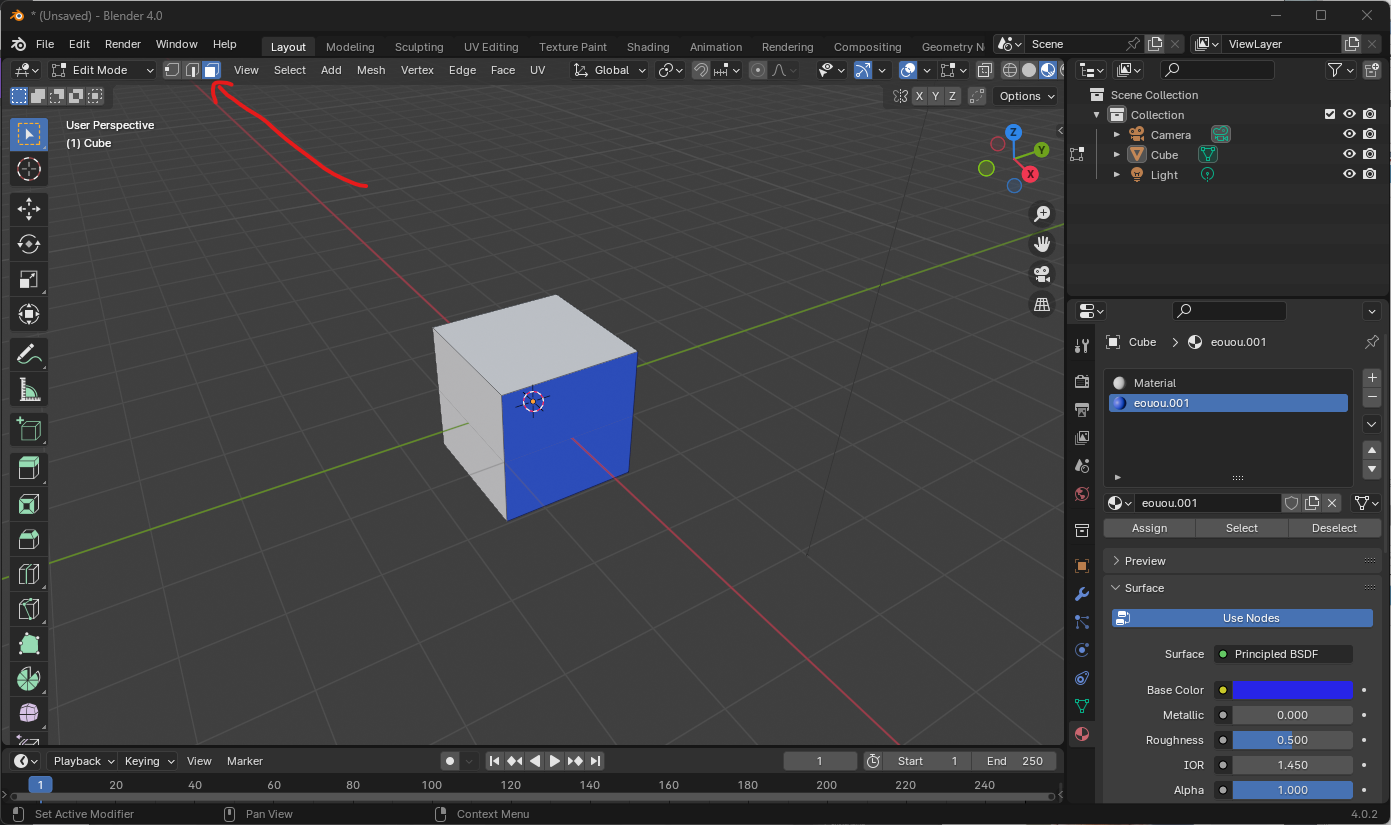
Select the face you want to change, then click the "materials" tab:

Now create a new material, assign it to the face, and change that materials colour

Congrats!

Become A Roboticist In 1 Month

Buy nowLearn more

Week 0: Setup Your Computer For Creative Robotics

Delayed 0 days

  • What to expect over the next 4 weeks
  • Windows 11 : Setting Up Your Computer with Docker, WSL and VS Code
  • GitHub, FreeCAD and Blender2
  • Ubuntu 22.04: Setting up your computer with Docker and VS Code
  • Why Using Docker Will Save You Hours Of Debugging
  • The Best Way To Save Complex Robotic Projects: Git, GitHub and VCSTool
  • How To Look Like A Hacker With No Effort: Quickly Using The Linux Command Line 2
  • 3 Tips To Rapidly Build Models In FreeCAD1
  • How To Publish Your Robotics Work On Social Media Such As LinkedIN
  • Ready To Create Robots Checklist
  • Week 0 Live Session

Week 1: Getting To Know ROS 2 And KRYTN Robot

  • How To Drive A Robot: Teleoperation Of KRYTN
  • Is The Robotic Operating System Actually Just Like A Discord Group? Peering Under The Hood
  • Using The SOLn Framework To Setup Your Robot9
  • Giving Your Robot Eyes: How To Simulate Sensors For KRYTN
  • Giving Your Robot Memory: Setting Up Mapping With KRYTN robot2
  • Self Driving Robot?!? How To Setup Autonomous Navigation For KRYTN Robot2
  • Designing Your First Robot Link: Using FreeCAD To Sketch Over An Image
  • Make Your Meshes Shine! How To Use Blender To Colour Your Meshes
  • How To Add Stuff To Your Robot: Adding A Coffee Tray To KRYTN1
  • My Robot Is Broken! 5 Tips For Debugging ROS
  • Day 1 Task: Teleoperating A Robot
  • Day 2 Task: Peering Under The Hood
  • Day 3 Task: Adding Eyes
  • Day 4 Task: Making A Map
  • Day 5 Task: Creating A Tray
  • Day 6 Task: Adding Tray To Robot
  • Day 7 Task: Publish Your Work
  • Week 1 Live Session

Week 2: Robot Arms, The MACI Robot

Delayed 7 days

  • How To Move Your Robot Arm: Using the MoveIT Package1
  • How To Deal With Robot Complexity: Cleaning the Workspace For MACI2
  • Using Other Peoples Code For Robot Models (URDF, XACRO and spawning in launch files))1
  • Giving You Robot Hands: Designing A Simple Gripper In FreeCAD1
  • Installing The Gripper On MACI And Configuring It Using MoveIT2
  • Programming Your Robot: Writing A Simple Python Script To Open And Close Your Gripper
  • How To Use Other Peoples Work To Move Your Robot: Using pymoveit2 To Script Your Robot
  • Adding Something For MACI To Pick UP: Using Gazebo To Create An Environment
  • Day 8 Task: Using MoveIT
  • Day 9 Task: Create A Gripper
  • Day 10 Task: Attach Gripper
  • Day 11 Task: Control Gripper
  • Day 12 Task: Using pymoveit2
  • Day 13 Task: Adding Something To Pick Up
  • Day 14 Task: Publish Your Work
  • Week 2 Live Session

Week 3 & 4: Find a Robot And Simulate It

Delayed 14 days

  • How To Sketch A Robot In FreeCAD For ROS: The 4S Method
  • Don't Start From Scratch Again: How To Use KRYTN and MACI Projects As Templates
  • Fantastic Robots And Where To Find Them: How To Pick A Robot To Simulate
  • How To Create Interesting Environments? Use Your Phone To Scan The World And Load It Into Gazebo
  • 3 Example Robot Simulations Created From Images Of Real Robots
  • Gazebo Is Boring Without Plugins: Configuring Gazebo Plugins To Let Your Robot Move And See
  • 3 Tips For Your Robot Build
  • From Simulation To Real World: What You'll Need To Change To Use These Templates On A Physical Robot
  • Day 15 Task: 4S Method
  • Day 16 Task: Using Projects As Templates
  • Day 17 Task: Picking A Robot
  • Day 18 Task: Scanning Your Environment
  • Day 19 Task: Setup Gazebo Plugins
  • Day 20 Task: Example Robot Simulations
  • Day 21 Task: Publish Robot So Far
  • Day 22 Task: Spawn a known robot
  • Day 23 Task: Spawn your robot
  • Day 24 Task: Configure Sensors
  • Day 25 Task: Robot Teleoperation
  • Day 26 Task: Environment Mapping
  • Day 27 Task: Autonomous Operation
  • Day 28 Task: Celebrate and Publish Your Robot
  • Live Session Replay Week 3
  • Live Session Replay Week 4
  • Live Session Replay Week 5